 Free shipping

Custom Printed Envelopes and Envelope Printing: The Complete Business Guide
Every piece of mail your business sends makes a decision the moment the recipient picks it up. A plain white envelope with a return address label says the organization is functional. A custom-printed envelope with the logo, return address, and brand colours printed directly on the face says something different: it signals an established operation before anything is opened. For businesses that mail regularly, whether invoices, statements, payroll, proposals, or client correspondence, custom-printed envelopes are one of the most cost-effective brand upgrades available, because every outgoing piece benefits from the same print run.
This guide covers what envelope printing means, what gets printed and where, and the artwork specs that produce clean results. It also covers when to choose custom window envelopes over envelopes with an address printed, how to select the right size and ink option, and how the ordering process works from artwork submission to delivery.
Why Custom Printed Envelopes Are Worth the Investment
The business case for custom-printed envelopes is clear. Custom-printed envelopes are not a specialty item for large organizations. Research from direct mail studies consistently shows that branded outgoing envelopes generate 20 to 40 percent higher open rates compared to plain white envelopes with labels. The envelope is the first physical impression before any content is read. A logo and return address printed directly on the face signal an established organization. A peeling label on a generic white envelope signals a less-organized one.
The cost argument is equally clear. Custom-printed business envelopes are not a luxury item. A standard custom printed envelope order falls within a range that competes directly with the combined cost of blank envelopes plus return address labels, plus the time to apply them. At any meaningful mailing volume, the printing pays for itself in labour reduction alone. The branded appearance is the free upgrade that comes with it.
For organizations already printing return address labels and applying them manually to blank envelopes, the comparison is direct: calculate the per-label cost, the time cost per piece, and the occasional misalignment or peeling label that reaches a client. Custom envelope printing eliminates all three variables.
What Custom Printed Envelopes Are and What Envelope Printing Puts on the Face
Custom printed envelopes are standard commercial envelopes with your organization's information printed directly on the paper during production. The print is not a label applied after manufacturing. It is part of the envelope itself, applied before the envelope ships to you. This distinction matters in practice: a printed return address does not peel in transit, does not misalign relative to the envelope face, and does not look different from one box to the next, the way a hand-applied label program can.
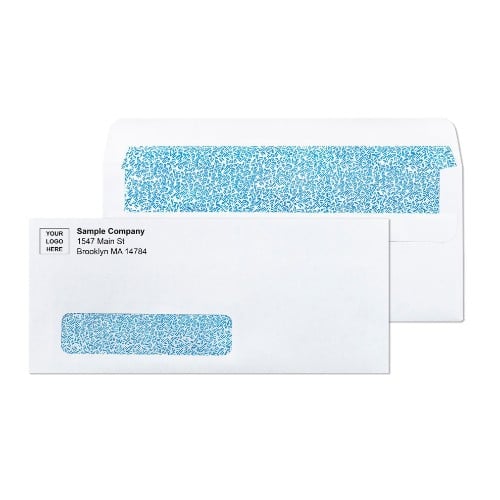
Standard envelope printing places four elements in the upper-left zone of the envelope face:
- Company name in the typeface and size that matches your brand guidelines
- Return address on the lines below the company name: street address, city, state, ZIP
- Logo positioned to the left of or above the text block, sized to fit within the available print zone
- Optional additions such as a phone number, website URL, tagline, or certification mark
The print goes on the face of the envelope, not the back or the flap. The right-hand area of the face is left clear for postage. The center of the face is left clear for the delivery address, either handwritten, printed via label, or shown through a window on window envelope formats. The bottom five-eighths of an inch across the entire face stays completely clear regardless of the design, because USPS applies a Delivery Point Barcode in that zone during automated sorting. Anything printed in that strip interferes with barcode placement and pushes the piece out of automated processing.
This means the effective print area for custom envelope printing is the upper-left quadrant of the envelope face. For a standard #10 envelope at 4-1/8 by 9-1/2 inches, the print zone is approximately 3.5 by 2.5 inches. For larger formats like the 9x12 booklet mailer, the same upper-left zone is proportionally larger and can accommodate more design elements.
Custom Window Envelopes vs Envelopes With Address Printed: Which Eliminates More Work
Both formats put your branding on the envelope face and reduce manual work in your mailing operation. The critical difference is how the recipient's delivery address is handled, and that difference determines which format is right for each type of program.
Custom window envelopes
Custom window envelopes combine two features: your logo and return address printed on the face, plus a transparent opening that shows the recipient's delivery address from the document inside. The address on each piece comes from whatever is printed on the document, whether an invoice, a statement, or a letter, not from the envelope itself. This means the same box of envelopes can be mailed to a different recipient on every single piece without any modification to the envelope.
For billing programs, payroll operations, and any recurring mailing where the recipient list changes piece by piece, custom window envelopes effectively eliminate the addressing step. The invoice goes in, the flap seals, and the correct address shows through the window. No label. No printing step on the envelope. No manual address entry. The branded envelope face handles the return address and the logo. The document handles the delivery address.
Custom window envelopes are available in single window and double window configurations. The single window shows the delivery address. Double window shows both the delivery address in the lower window and the return address in the upper window, pulling both addresses from the printed document inside. Double window formats are standard for check mailing programs where both the payer and payee addresses are already on the check. For the full window envelope range, see window envelopes.
Envelopes with the address printed
Envelopes with an address printed have the recipient's delivery address printed directly on the envelope face during production, alongside the return address and logo. Each envelope in the order carries one specific recipient address. This format is used when the recipient list is fixed and known before ordering: a specific mailing to a specific list of clients, a direct mail campaign to a targeted list, or an invitation mailing where every recipient is predetermined.
Envelopes with the address printed eliminate the addressing step at the point of mailing, but they require knowing the full recipient list before the order goes to print. A change to the list means a new print run. For stable lists where the same people receive the same mailing repeatedly, this format can produce a polished result. For programs where the recipient list changes frequently, custom window envelopes are the more practical choice because the envelope itself never changes.
| Feature | Custom Window Envelopes | Envelopes With Address Printed |
|---|---|---|
| Recipient address source | Document inside (changes per piece) | Printed on envelope (fixed at order time) |
| Best for | Billing, payroll, recurring mail | Fixed-list campaigns, invitations, announcements |
| Address the step at mailing | None (window handles it) | None (pre-printed handles it) |
| Flexibility for list changes | High (same envelope, different documents) | Low (new print run required) |
| Custom printing on the face | Yes (logo, return address) | Yes (logo, return address, delivery address) |
Custom Business Envelopes: Choosing the Right Size for Every Program
Custom envelopes from Business Envelopes are available in every size in the catalogue. Custom printing is offered across all of them. The size choice is driven by what goes inside and which USPS postage class you need to stay within.
#10 envelope: 4-1/8 x 9-1/2 inches
The #10 is the most ordered custom printed format in the US. It holds a standard 8.5 by 11-inch sheet, tri-folded and mails at First-Class letter rate. For invoices, statements, payroll notices, client letters, and everyday business correspondence, the #10 is the default. Custom printing on the #10 comes in plain white, security-tinted, single window, and double window configurations. All versions take the same logo and return address in the upper-left zone. Available in every ink option and closure type at #10 envelopes.
#9 envelope: 3-7/8 x 8-7/8 inches
The #9 is the standard return reply envelope enclosed inside an outgoing #10. Printed with your return address and logo, it handles the branding on the return path so the complete mailing program, outgoing and return, carries consistent brand identification. For billing programs that include a payment return envelope, printing both the #10 outgoing and the #9 return creates a fully branded two-piece set.
#6 3/4 remittance envelope: 3-5/8 x 6-1/2 inches
The #6 3/4 remittance with extended flap is the donation and payment reply format for nonprofit, healthcare, and billing programs. Custom printing goes on the face with the delivery address for your payment processing address. The extended flap inside carries the donor or payer information form. A printed #6 3/4 enclosed in a printed #10 outgoing creates a professional, fully branded reply mail program.
6x9 and larger flat mailers
Custom printing extends to the full flat-document format range: 6x9 booklet, 9x12 booklet and open-end, and 10x13 catalogue formats. For marketing programs, law firm client correspondence, and organizations mailing annual reports or branded proposals, custom printing on the flat mailer face turns a functional document carrier into a brand statement. The print zone on larger formats accommodates more design elements than the #10, including taglines, secondary logos, or QR codes. See the full range of all sizes of envelopes.
Artwork File Specifications for Envelope Printing
Clean artwork produces clean results. The most common cause of a proof that does not look right is an artwork file that was not prepared to print standards. These specifications apply to custom envelope printing at Business Envelopes and reflect industry-standard requirements across commercial envelope printing generally.
File format
An EPS vector file or a print-ready PDF is preferred for the sharpest possible output. For PDFs, use PDF/X-1a settings for standard artwork. If your artwork includes transparencies or overprinting effects, use PDF/X-4 instead. Vector formats reproduce the logo at any size without pixelation, which matters most when the logo is scaled to fit the available print zone on different envelope sizes.
High-resolution PNG or TIFF files are acceptable when a vector file is not available, but the resolution requirement is non-negotiable. Photographs and complex artwork must be at least 300 dpi at the intended print size. Line art, logos, and text-based elements must be at least 1200 dpi at print size. Never submit a logo pulled from a website. Website images are typically 72 to 96 dpi, which produces visibly degraded output when printed at standard envelope sizes.
Fonts and text
All text in the artwork file must have fonts converted to outlines or curves before submission. Converted outlines embed the letter shapes directly in the file, so the printer does not need to have the same font installed on their system to render the text correctly. Submit artwork with live fonts that are not embedded, and the output will substitute a different font, which changes the letter spacing, the character shapes, and the overall appearance of the return address block.
No hairline rules or lines. Any rule or border in the design must have a defined stroke width. Hairlines, which are lines defined at zero width or at fractional point widths, either disappear entirely in print output or print inconsistently depending on press conditions.
Color definitions
All colours must be defined as CMYK process colours or PMS spot colours. Never use RGB colour definitions in print files. RGB is the colour model for screens. Converting RGB to CMYK at the press stage produces colour shifts that make your brand colours look different from their screen appearance and different from other printed collateral using the same brand colours.
For black-and-white printing, all design elements should be set to 100% black (K = 100) rather than a rich black or registration black blend. For spot colour printing, assign the correct PMS number to each colour in the file and ensure unused colours are deleted from the colour palette, including those embedded in placed graphics.
Knockout, overprints, and traps
Set all colours in your artwork file to knockout rather than overprint. Overprinting means one ink layer prints on top of another, which can produce unexpected colour results at the press stage. Set colours to knockout so each colour element replaces the area beneath it rather than printing on top. The pre-press team at the printing facility handles any overprints and traps that the specific press configuration requires. Delete all unused colours from the colour palette before submitting, including colours that may be embedded inside placed EPS or graphic files.
File compression and submission
Compress your artwork file into a ZIP folder before emailing to reduce the chance of file corruption during transfer and to speed up the upload. Large uncompressed files can time out during email submission or arrive with corrupted data. If you are submitting multiple files, such as a logo EPS plus a hard copy reference PDF, compress both files together into a single ZIP archive and attach that. Include a brief note with the compressed file that identifies the envelope size, quantity, and ink colour option for the order.
White space and design clarity
Keep white space around the logo and address block. The upper-left print zone on a #10 envelope is approximately 3.5 by 2.5 inches. Filling every available pixel of that space with design elements does not improve the result. A logo surrounded by appropriate white space reads more clearly at arm's length than a crowded layout. The same principle applies to larger format envelopes, where the print zone is proportionally larger.
Digital PDF for internal consistency
Once the proof is approved, save a copy of the approved proof PDF for internal reference. The approved proof is the visual standard your team can compare against when boxes arrive. It is also useful for briefing new vendors or designers who may need to reproduce the same return address and logo layout on future orders or on other branded stationery, such as letterhead.
Envelope Printing Methods: Commercial vs In-House
Custom business envelopes are printed by one of two methods, depending on quantity and the level of personalization required.
Commercial offset printing is the standard method for any order above a few hundred pieces. The setup cost is absorbed across the full quantity, which drives the per-unit price down significantly at higher volumes. Business Envelopes uses commercial offset printing for all custom orders. The result is consistent colour, sharp logo reproduction, and print quality that stays uniform from the first envelope in the box to the last.
Digital printing handles variable data programs, where each envelope carries different printed information. If you need each envelope to print not just your return address and logo but also a unique recipient address, a personalized message, or a variable code on the face, digital printing manages this at the production stage. Business Envelopes handles both standard custom printing and variable data programs. For variable data envelope programs, contact Business Envelopes directly to specify the program requirements before placing the order.
In-house inkjet or laser printing on blank envelope stock is an option for on-demand programs where quantity is small, and the only requirement is the return address printed on each piece without a label. For this use case, standard 24 lb white wove envelopes feed reliably through most office laser printers. Always run a test feed through the specific printer model before loading a stack. Feed envelopes one at a time using the manual feed slot and verify that the toner adheres cleanly without smearing before running a full batch. Blank envelope stock compatible with in-house printing is available at regular envelopes.
Ink Options: Black vs Full Colour for Custom Printed Envelopes
Every custom envelope order involves one ink choice: black ink only, or full-colour printing. The right answer depends on the program, not on a preference for one or the other.
Black ink envelope printing
Black ink is the correct choice for everyday business correspondence, billing programs, and payroll. If your organization's logo works in a single colour, which most commercial logos are designed to do, black ink produces a clean, professional result at the lowest per-envelope print cost. The return address, company name, and logo all print in sharp black. The result looks exactly like a professionally printed business envelope because it is one. The absence of colour does not make the envelope look less professional. A sharp black logo on a white envelope is the default for thousands of established US businesses.
Black ink printing is also the correct choice for security-tinted check envelopes where the envelope body already has a dark interior pattern. The exterior face is still white, and a black logo and return address on a white face with a security-tinted interior is the standard for every bank, payroll service, and healthcare billing operation that mails checks at volume. See check envelope formats at check envelopes.
Full-colour envelope printing
Full-colour printing reproduces the logo in its exact brand colours: the PMS-specified blue, the brand red, and the two-colour combination that appears on your website, business cards, and letterhead. For client-facing proposals, marketing mail, annual report packages, and any program where visual brand consistency across all materials is a priority, full-colour printing is the right choice. It costs more per envelope than black ink, but the difference narrows at higher quantities, and the visual impact is measurably different for programs where recipients are evaluating the organization's professionalism before opening the piece.
Full-colour printing is also available on colored envelope stock, including wove colours and starburst formats, for direct mail programs where the outer envelope is part of the creative strategy. A colored envelope with a full-colour logo on the face is a different visual statement from a white envelope with the same logo. For programs where the objective is to stand out in the mailbox rather than to communicate institutional reliability, the colored stock plus full-colour print combination is worth evaluating. See the starburst and wove color range at colored envelopes.
| Factor | Black Ink | Full Color |
|---|---|---|
| Best for | Billing, payroll, correspondence | Client-facing, marketing, proposals |
| Cost | Lower | Higher (narrows at volume) |
| Logo in brand colours | No | Yes |
| Works on security tinted stock | Yes | Yes |
| Works on colored envelope stock | Yes (limited contrast) | Yes (full contrast) |
Custom Envelopes With Logo and Business Envelopes With Logo: Branding Decisions That Affect Print Results
Custom envelopes with a logo look better when a few decisions are made correctly before submitting the artwork. These are not design preferences. They are practical choices that affect the print quality and the professionalism of the result.
Logo version to use
Use the vector version of your logo. Every professionally designed logo has a vector source file, typically in EPS or AI format. If your organization does not have access to the vector logo file, contact the designer or agency that produced it. The vector file is the master. Raster exports from the vector are what you use for websites and documents. The vector itself is what the printer needs. If you cannot locate a vector version, supply the highest-resolution raster version available, at a minimum of 300 dpi at print size, and the proof will show whether the output is acceptable.
Logo sizing in the print zone
The print zone on a #10 envelope is approximately 3.5 by 2.5 inches. A logo that looks proportional on a business card or letterhead may appear oversized, undersized, or cramped when placed in this specific zone alongside a three-line return address block. The PDF proof is where this becomes visible. If the logo overwhelms the return address text or if the return address text is too small to read at arm's length, the proof stage is when to request an adjustment. Plan for one proof revision round when ordering for the first time.
What to include beyond the logo and address
The return address block on a custom printed business envelope typically includes the company name, street address, city-state-ZIP, and a phone number or website URL. Some programs add a one-line tagline below the address block. Some add a QR code that links to a payment portal or a customer service page. Every element added to the print zone reduces the space available for others and increases visual complexity. A clean, legible logo plus three-line address plus optional website URL is the format that produces the most consistently professional result across different envelope sizes and ink options.
Envelopes that do not need a designer
If the goal is simply to print a return address and company name without a logo, custom envelope printing does not require a designer or a design file. Supply the text you want printed, the font preference if you have one, and Business Envelopes will typeset the return address block and provide a proof for approval. This is the correct starting point for organizations that have not developed a full brand identity but want to eliminate manual return address labels from their mailing operation.
The Custom Envelope Printing Process: From Artwork to Delivery
Knowing what happens at each stage helps set realistic expectations and avoids the delays that come from unclear artwork submissions or missed proof approvals.
Step one: Select the envelope format and quantity
Choose the size, closure type, stock (plain white, security tinted, colored, or window), and quantity before submitting artwork. Custom printing is available across every format in the Business Envelopes catalogue. No minimum order applies, which means you can order a test quantity of 250 or 500 to verify the print result before placing a larger order for a full program cycle. See the complete catalog at printed envelopes.
Step two: Submit the artwork file
Submit your logo as a vector EPS or print-ready PDF with fonts converted to outlines and all colours defined as CMYK or PMS. Include a hard copy or screen-resolution reference image that shows what the final result should look like. The reference image helps pre-press identify any discrepancies between the submitted file and the intended result before the proof is generated.
Step three: Review the PDF proof
Every custom order goes to a PDF proof before any printing occurs. Nothing prints without your approval. The proof shows exact print placement on the correct envelope template, font rendering at actual size, logo position and scaling, and return address layout. Check the following on every proof: the logo reproduces cleanly without pixelation, the return address text is legible at the point sizes shown, and no design elements fall within the bottom 5/8-inch barcode clear zone. Confirm the layout matches the reference image you submitted.
If adjustments are needed, request them during the proof stage. This is the point where minor positioning corrections, font size changes, and layout refinements happen. Once the proof is approved, the approved file goes to production. Requesting changes after proof approval means a new proof cycle and a delay to the production timeline.
Step four: Production and shipping
Custom printed orders ship within 7 to 10 business days from proof approval. Free shipping to the contiguous 48 states on every order, regardless of quantity. Artwork stays on file after the first approved proof. Every reorder reproduces from the same approved file without re-submitting artwork or running a new proof cycle, as long as the format and specifications do not change.
Common Mistakes When Ordering Custom Printed Envelopes
Submitting a website-resolution logo. A logo pulled from a website at 72 dpi prints blurry at envelope scale. Always use the vector source file or a high-resolution export at 300 dpi minimum.
Using RGB color definitions. RGB is for screens. Print files must use CMYK or PMS spot colours. A logo defined in RGB will shift in colour when converted to CMYK during prepress, and the result may not match your brand standards.
Approving a proof without checking the barcode clear zone. Confirm that no design element sits within the bottom 5/8 inch of the face before approving. This is easy to miss on a proof viewed on screen at reduced size.
Not ordering a test quantity before a large production run. A test order of 250 or 500 envelopes confirms that the print placement is correct, the logo reproduces as expected, and the format works with your mailing equipment and document templates before you commit to a larger volume.
Printing text in a font that was not converted to outlines. If the proof arrives with different letter shapes than expected, the cause is almost always an unconverted font. Convert all text to outlines before the first submission, but this does not happen.
Designing for the wrong print zone size. A design built around a full-page or business-card layout does not automatically translate to the upper-left envelope print zone. Build or adapt the design to the specific print zone dimensions of the envelope size being ordered.
Why Business Envelopes for Custom Printed Envelopes and Envelope Printing
Business Envelopes has printed custom business envelopes for US organizations since 1997. Here is what matters specifically for a custom printing program.
Printing on every format in the catalogue. Custom printing is not limited to the #10. Every size from the #6 3/4 remittance through the 10x13 flat mailer is available with custom logo and return address printing. The same program can run a printed #10 outgoing, a printed #9 return, and printed flat mailers from a single supplier with artwork on file for all three. See the complete printed range at printed envelopes.
No minimum order. Order the quantity the program requires. Test a small batch before committing to volume. Artwork stays on file, so reorders reproduce exactly without resubmitting files.
PDF proof before every production run. Nothing prints without approval. The proof stage exists specifically to catch placement issues, font substitutions, and color discrepancies before they become a full production run of incorrectly printed envelopes.
7 to 10 business days from proof approval. Blank stock ships the same or next business day. For programs where both blank and custom printed formats are needed simultaneously, both can be sourced from the same catalogue. See all available formats at all items and the self-seal range at self-seal envelopes.
Free shipping on every order. Free ground shipping to the contiguous 48 states on custom-printed and blank stock alike, with no minimums on either.
Additional Options: When Custom Stamp or In-House Addressing Makes Sense
For organizations that mail infrequently or in very small quantities, a self-inking address stamp with your company name and return address provides a low-cost alternative to custom envelope printing. The stamp reproduces the return address on blank envelopes without a print run. It costs less upfront for tiny quantities and produces a result that is clearly better than a peel-and-stick label. The limitation is that the stamp does not include a logo in colour, and the alignment is manual rather than precise. For any program that mails more than a few hundred pieces per cycle, custom-printed envelopes produce a more consistent, more professional result at a lower per-piece cost than a stamp program.
Custom printed envelopes also pair with matching custom letterhead to create a complete branded stationery set. When the envelope face and the letter inside share the same logo treatment, typefaces, and colour palette, the recipient receives a cohesive package that signals brand investment before reading a word. For any organization that already uses custom letterhead, extending the same print program to the envelopes is the logical next step.
Summary: What to Do Next
Custom printed envelopes and envelope printing are not complicated. The key decisions are the envelope format, the ink colour, and the artwork file. Get those three right and everything else, the proof, the production, the reorder, follows a predictable process. Start with a test quantity if it is your first order on a new format. Submit the vector logo file with fonts converted to outlines and colours defined as CMYK or PMS. Review the proof against the barcode clear zone requirement. Approve, and the order ships within 7 to 10 business days.
For organizations that mail regularly, the per-envelope cost of custom printing is typically lower than the combined cost of return address labels plus the labour to apply them across a full mailing cycle. The branded envelope also produces a better-looking result. The math and the outcome both favour printing.